
Debadging your car can be a simple and effective way to give it a cleaner, more streamlined appearance. Whether you're looking to remove dealership badges, model designations, or manufacturer logos, this process can transform the look of your vehicle with minimal effort.
How To Debadge Your Car
In this comprehensive guide, we'll walk you through the steps to safely and effectively debadge your car.
Why Debadge?
Before diving into the process, let's explore why you might want to debadge your car. Debadging can enhance the aesthetic appeal of your vehicle by removing unnecessary clutter from its exterior. It can also offer a more custom look, allowing you to personalize your ride to better suit your preferences. Additionally, debadging can help maintain a sleek, understated appearance, which is favoured by many automotive enthusiasts.
Materials Needed
To debadge your car, you'll need a few basic tools and supplies:
- Heat gun or hair dryer
- Fishing line or dental floss
- Plastic trim removal tools
- Adhesive remover or rubbing alcohol
- Microfiber cloth
- Wax or polish (optional)
Step 1: Prepare Your Tools
Gather all the necessary tools and supplies listed above before starting the debadging process. Having everything readily available will make the job smoother and more efficient.
Step 2: Heat the Adhesive
Using a heat gun or hair dryer set to a low heat setting, warm up the adhesive behind the badge or emblem you intend to remove. Hold the heat source a few inches away from the surface and move it back and forth in a sweeping motion. Be cautious not to overheat the area, as excessive heat can damage the paint.
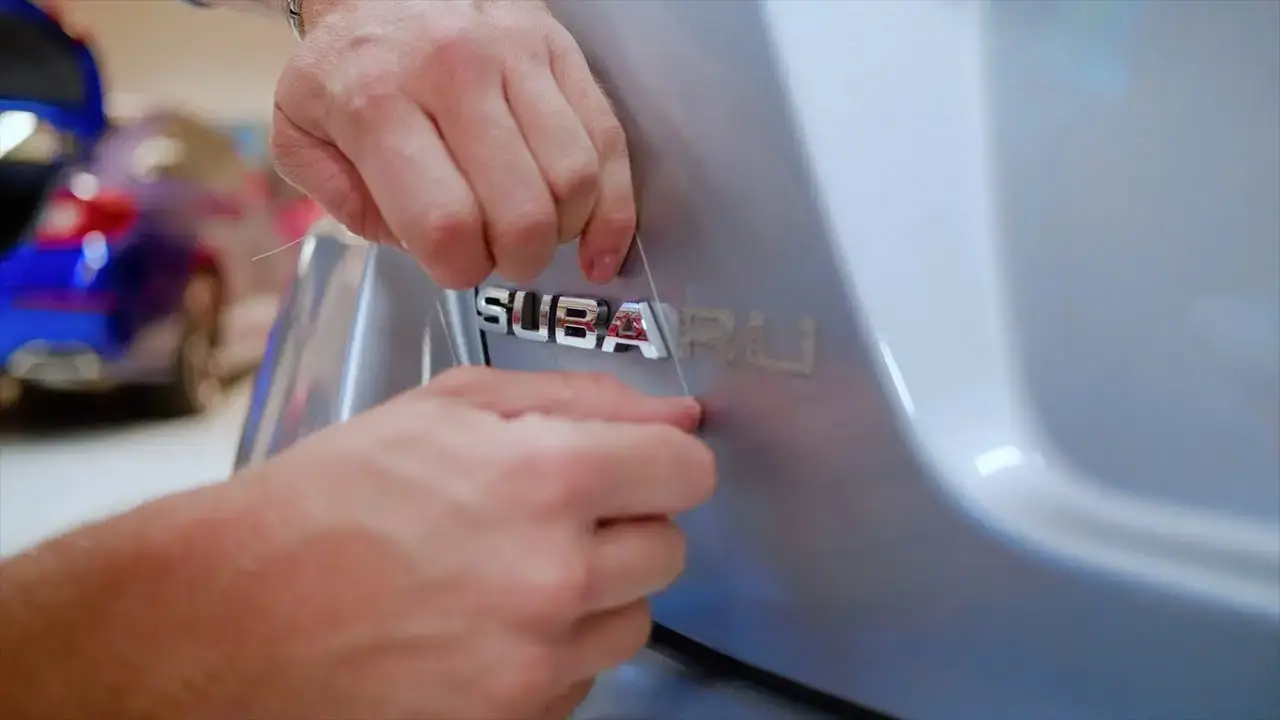
Step 3: Loosen the Badge
Once the adhesive has been sufficiently heated, take a length of fishing line or dental floss and carefully slide it behind the badge. Gently saw back and forth to cut through the adhesive and loosen the badge from the surface of the car. Take your time to avoid scratching the paint.
Step 4: Remove the Badge
With the adhesive loosened, use your fingers or plastic trim removal tools to carefully pry the badge away from the car. Work slowly and steadily, applying gentle pressure as needed. Be cautious not to damage the paint or surrounding trim during this process.
Step 5: Clean the Surface
After removing the badge, there may be residual adhesive left on the surface of the car. Use an adhesive remover or rubbing alcohol to dissolve the adhesive and wipe it away with a microfiber cloth. Ensure the surface is clean and free of any residue before proceeding.
Step 6: Polish (Optional)
If desired, you can polish the area where the badge was removed to restore the shine and smoothness of the paint. Apply a small amount of wax or polish to the surface and buff it to a high shine using a clean microfiber cloth.
Step 7: Final Inspection
Once you've completed the debadging process, take a step back and inspect the area to ensure it looks clean and uniform. Make any necessary touch-ups or adjustments to achieve the desired result.
Debadging your car is a straightforward and rewarding DIY project that can significantly enhance its appearance. By following the steps outlined in this guide and exercising patience and caution, you can achieve professional-looking results and give your vehicle a custom, personalized touch. Whether you're looking to create a cleaner aesthetic or add a touch of individuality to your ride, debadging is a simple yet effective way to achieve your desired look.
Related posts

In Car Guides
Are Your Car Mods Boosting Performance or Hurting It?
Car modifications can transform your ride, but not every upgrade delivers the results you expect. Some mods unlock performance, while others cause hidden problems. In this guide, we’ll break down how to spot effective upgrades, identify warning signs, and decide when it’s time to let go of a modification.

In Car Guides
How to Clean Your Car in Winter
Winter’s harsh conditions can damage your car’s paint, undercarriage, and interior. Regular cleaning prevents rust, maintains visibility, and keeps your ride in top shape. Here’s how to do it right.

In Car Guides
Cheapest Hatchback Cars in 2025: Top 7 Affordable Options
Hatchbacks are a top choice for budget-conscious drivers. They’re compact, practical, and affordable, making them perfect for first-time buyers or anyone looking to save money.

In Car Guides
How to Jump Start a Car Battery: Step-by-Step Guide
Learn how to jump start a car battery with this easy, step-by-step guide. Discover tips on using jumper cables and safely jump-starting a dead battery.
Add a comment